Machine Learning with Unity3d (Part II)
This part will cover how to train you machine learning environment.
In the previous part we demonstrated how to setup and write scripts for our simple example where an agent locates a food source while avoiding obstacles.
If you haven't read it, I recommend you to read Part I and then start with Part II.
If you are only interested in how to train your ML agents you can continue with Part II.
Below is the video showing what our trained environment output will look like.
In Part I, we completed setting inspector parameter values for by linking brain and agent and setting up brain parameter with respect to our agent logic.
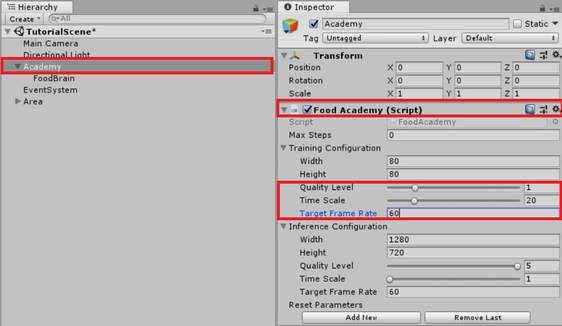
Now the only thing to setup before we can start our training is the Academy script parameters.
Academy Script
Click on our Food Academy gameobject to tweak its parameters from the inspector window.
Expand training configuration and set the following values:
Quality level = 1
Time scale = 20
Target frame rate = 60
Let me explain a bit what these values would mean and how to tweak them in your future experiments.
There are two ways how you can train ML agents. One is from within the Unity Editor and another is by building and using executable file.
1. The width and height specify the resolution of your executable, although you can resize the executable window even if set these values. So do not bother about these.
2. Quality level represents normal Unity graphics quality. The higher quality --> More training time and Less frame rate. You get the idea.
3. Time scale is the Unity's time scale so having a higher time scale will have the agents train at much faster speed albeit it will be hard to visualize as you can imagine the speed with time scale > 10
4. Target frame rate as the name suggests, the training within the editor or the executable will try to meet this value. Although time scale and quality level may have an affect on this and it depends whether your machine can support meeting this frame rates.
I suggest try different values and play around with it till you are happy with the settings.
VERY IMPORTANT FINAL STEP BEFORE TRAINING (DO NOT IGNORE)
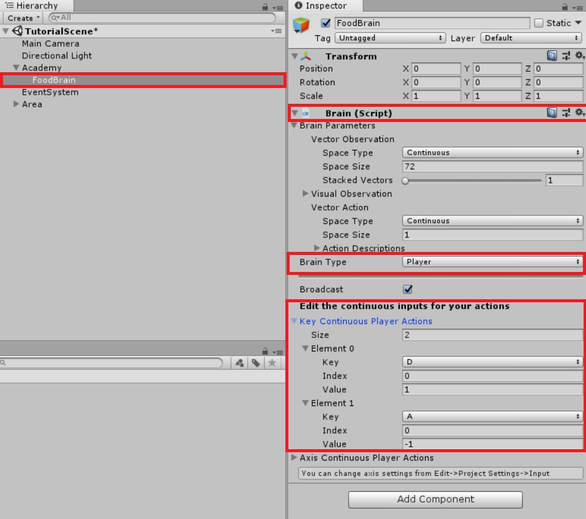
You can see from the above image that I have the Food Brain selected and selected its Brain Type as Player.
Now there are different Brain types you can select, they are:
1. Player - Agent is controlled by Player Input
2. External - Agent is controlled real-time during training process
3. Internal - Agent is controlled by a saved trained model
4. Heuristic - Agent is controlled by a custom code
Now before training it is very very very important that you test the environment you created by controlling the agent yourself. This is very important to let you understand and think from an agent's perspective and tweak any design flaws that might make some task unreachable or some goal position unreachable.
To map the inputs check the continuous Player action keys and map according to our brain outputs.
Now in our example, we only have 1 brain output i.e rotateDir. We want our agent to rotate left or right. Thus, map the keys as A , D or left / right arrow keys and set both their indices to 0 as we will only use vectorAction[0] but set their values as 1 and -1. This will mimic the brain output value of vectorAction[0] to be 1 or -1 based on the key press.
If you had more brain output values say speed = vectorAction[1], you can map another key say W with index as 1 and value as 10 being the speed value and so on.
TRAINING FINALLY !!
Finally we have reached the training point. Training is pretty simple. Once you have tested your environment by playing it yourself, change back the brain type to external which is the agent controlled during training process.

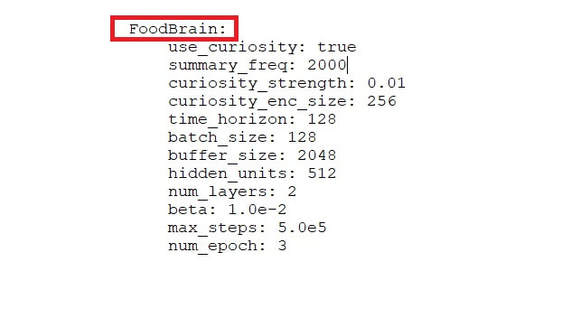
Browse to the directory MLAgents/python in your computer. You will see a trainer_config.yaml file.
This file specifies the training hyper-parameters that you need to experiment and change a lot as not always the default parameters will help you to achieve the desired outcome. Sadly there is no quick way or short-cut to this step as the parameters will differ from task to task and even from machine to machine. So just experiment with those.
I will post my Hyper-parameters that I used for training.
Just copy paste these parameters at the bottom and save the file.
Remember the spacing and indenting should match with the ones that are above this section. If you change you might get errors.
And note here the brain name should be same as the one you used in your Unity scene to name the game object where you attached the brain script.
If you want to know more about these hyper-parameters, you can view this link. It provides traditional training scenario values and specifies when and which parameters to tweak.
https://github.com/Unity-Technologies/ml-agents/blob/master/docs/Training-PPO.md
Now load your command terminal or whatever terminal or shell you use and browse to the same directory of MLAgents/python.
Ml agents use tensorflow for training and requires python version 3 or greater. Before training just a quick check to see if you have tensorflow installed correctly, type python or python3 or whatever loads your python version 3.
Then type import tensorflow as tf
If everything is installed correctly you should get no errors, quit the python console using Ctrl + C
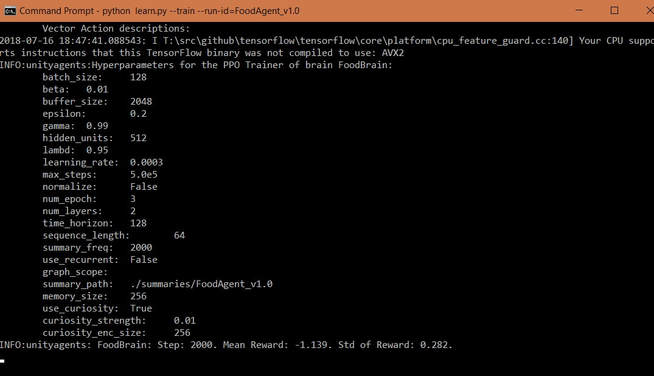
To start the training in Unity editor type the following lines:
python --train --run-id=FoodAgent_v1.0 then press Enter. This should prompt you to press play in Unity editor if everything worked correctly. After you pressed play in Editor your training should start and you should see something like this:
Ml agents use tensorflow for training and requires python version 3 or greater. Before training just a quick check to see if you have tensorflow installed correctly, type python or python3 or whatever loads your python version 3.
Then type import tensorflow as tf
If everything is installed correctly you should get no errors, quit the python console using Ctrl + C
To start the training in Unity editor type the following lines:
python --train --run-id=FoodAgent_v1.0 then press Enter. This should prompt you to press play in Unity editor if everything worked correctly. After you pressed play in Editor your training should start and you should see something like this:
After the training finishes or you get high reward value and agent performs good you can stop training by pressing Ctrl + C once. This will create a trained model inside the folder called "models" in the same python directory inside a folder with the name that you specified as the --run-id.
One important thing to do when you start training is to monitor training using Tensorboard. To do this, open up another terminal and navigate to same MLAgents/python directory.
Then type tensorboard --logdir=summaries, press Enter
Then once tensorboard gets initialized you will get a message to navigate to localhost:6006
Open your browser and type localhost:6006 to open up tensorboard.
You can read more here
github.com/Unity-Technologies/ml-agents/blob/master/docs/Training-ML-Agents.md
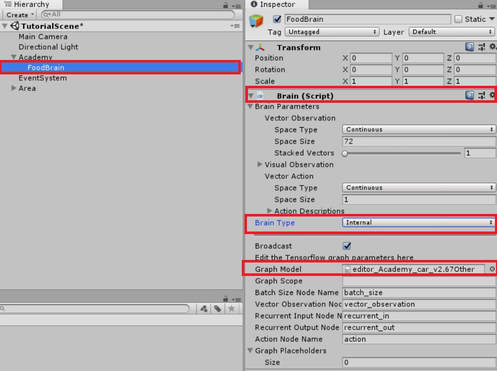
Testing the trained model
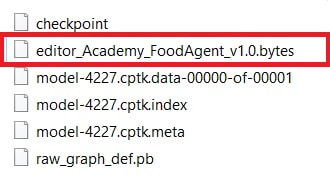
Once you have finished training or stopped when you were happy with the results, you will see this .bytes file created in the folder ML Agents/python/models/your run-id/
This is the file that we will use as our internal brain inside Unity.
Just drag and drop this file inside unity and then select the brain type as internal and assign this file in the Graph model field.
Of course your file name of the model would different than what is shown in the image.
Click play and Viola!! You have successfully trained your agent.
Create a random environment and test it.
Remember not to change the environment drastically and stay within the design rules otherwise your agent might not perform correctly.
Quick Tip: - To train your agents much faster, you can just duplicate the whole level and have multiple levels set up in the same scene. This will increase training performance while reducing training time.
Congratulations on making this far despite following a lengthy tutorial. I appreciate your time and efforts. Thank you.
At the end of it all, Just Have fun with Machine Learning!!
Show me what you came up with ML Agents, I am very interested in seeing your creations.