Machine Learning with Unity3d (Part - I)
We will be using Unity's ML agents to develop a very basic environment where an agent locates a food source by successfully navigating and avoiding obstacles. We will be using Reinforcement Learning as our machine learning scheme.
Before we dig deep into Unity project, I will provide a quick overview of Unity ML agents and Reinforcement Learning.
Before we dig deep into Unity project, I will provide a quick overview of Unity ML agents and Reinforcement Learning.
ML Agents
A while ago Unity released their machine learning toolkit called ML agents.
Here are some quick links to their blog posts and GitHub repository.
https://github.com/Unity-Technologies/ml-agents
https://blogs.unity3d.com/2017/09/19/introducing-unity-machine-learning-agents/
I would highly recommend giving all the posts a good read as it will provide you with a good entry point if you are unfamiliar with machine learning and its concepts.
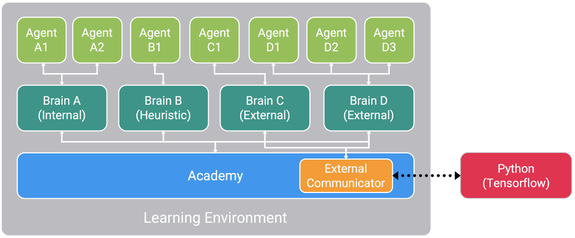
The above image taken from Unity website represents the basic workflow of ML agents.
It has 3 main components:
1. Agent - The agents will be our main players, characters or something that will be performing a task by taking various actions. The agent actions will be driven by the machine learning algorithm and not any input from the user.
2. Brain - Brains are the actual core component that perceives the environment and decides the actions that should be performed by the agents. One brain can control one or more agents. There can be multiple brains controlling multiple agents in an environment. Usually similar agents would have a single brain controlling them whereas vastly different agents would be controlled by different brains.
3. Academy - An academy object has all the brains in the environment as its child objects. There will only be a single academy per environment. An academy is used for configuration and settings like rendering quality or the timescale, resolution of the game.
And finally it uses a Python API to externally communicate with Tensorflow.
If you don't have ML agents or Tensorflow setup and ready to use, I highly recommend watching this tutorial video on how to setup ML agents and Tensorflow:
www.youtube.com/watch?v=qxicgknzUG8
Reinforcement Learning
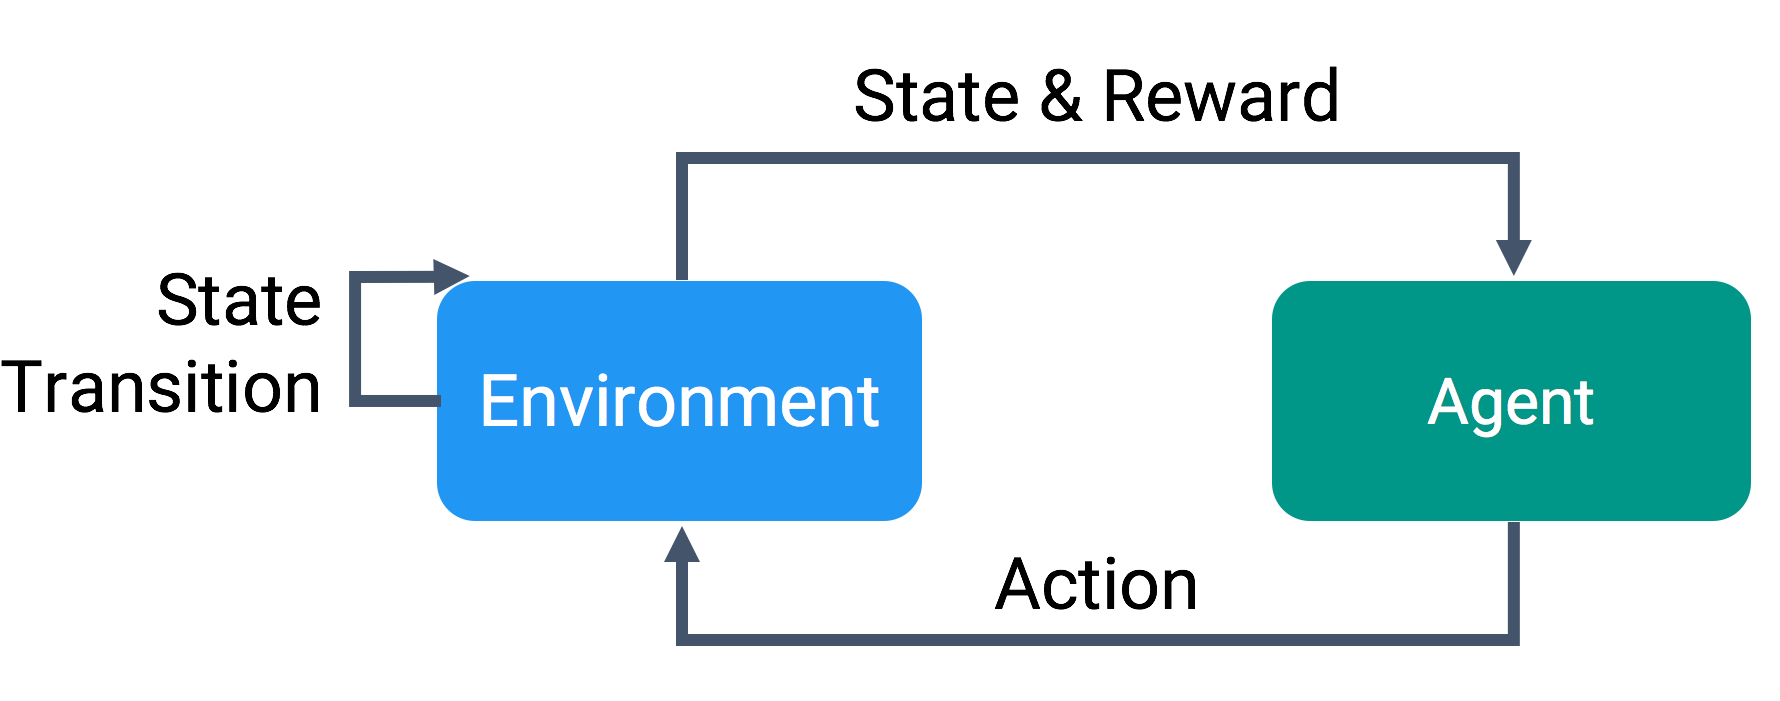
We are going to use Reinforcement learning in our example to train our agents.
Reinforcement learning is based on a reward system. For every action our agent performs, there will certain rewards associated with it.
Typically if the action taken allows agent to move closer to the goal or closer to completing a task, the agent will be positive rewarded and likewise if the action taken is far off from task completion, then the agent is penalized. This reward system is called as reward function.
Consider this example, there is a car (agent) and the task is to reach a target which is straight in line with the car at a distance of 50 units. The actions that the car (agent) can perform are move straight, turn right and turn left.
Now we can have a reward function based on the distance to target. If the distance between target and car keeps on decreasing we give a positive reward (agent is now close to completing a task) and likewise if distance increases we penalize the agent (agent is now worse than it was previously to completing a task). Finally we can give a bonus reward if the agent successfully reaches the target. We can also penalize the agent with every second to help it finish the task as early as it can.
Note:- the agent will initially take actions randomly. And only based on the rewards it will learn to take those actions that will give a greater overall reward.
Unity ML Agents Example
Now that a bit of theory part is covered, let us move on to the fun part of actually implementing ML Agents inside Unity.
If you have still not setup ML Agents and Tensorflow installation I recommend to watch this video tutorial before proceeding further.
www.youtube.com/watch?v=qxicgknzUG8
If you have still not setup ML Agents and Tensorflow installation I recommend to watch this video tutorial before proceeding further.
www.youtube.com/watch?v=qxicgknzUG8
Problem Description
We will be creating exactly what is shown in the below video. We will have an environment with walls which the agent has to avoid and locate a food source (green target). As of now I am using Unity 2018.1 and ML agents version 0.4
We will be creating exactly what is shown in the below video. We will have an environment with walls which the agent has to avoid and locate a food source (green target). As of now I am using Unity 2018.1 and ML agents version 0.4
Open Unity and click open project to open an already provided ML agents project. This can be found in the directory ML agents where you have it cloned or downloaded as zip from Git Hub repository. Open the project with folder titled "unity-environment".
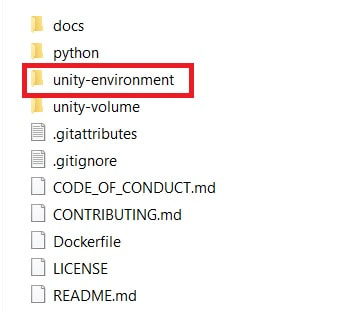
This will open a Unity project with some already existing examples. I highly recommend playing a bit with these examples to get a hang of how things work.
Let us create a new folder inside the examples folder called "Sample". You can name it whatever you like. We will be saving all scripts and files required inside this folder.
Once the folder is created create three new folders. I called them "Scripts" , "Scenes" and "Brains".
Let us now begin to develop our training environment for our problem.
1. Create a new scene and save it inside the scenes folder. You can name it whatever you like. Open up the scene once saved.
2. Let us note what things will be required inside the scene. We need a food source, an agent, some obstacles, an academy and a brain to control the agent.
3. Remember always any ML agent scene should have an academy and a brain as its child object.
4. Let us create an Academy and a Brain. Create an empty game object, reset everything and name it "Academy". Create an empty child game object of "Academy" and name it "FoodBrain".
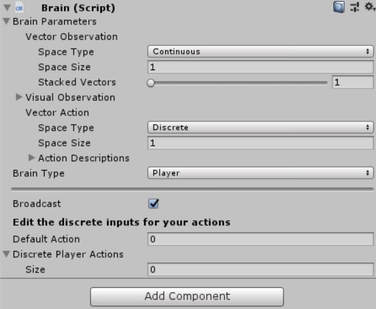
5. We now have our academy and brain objects ready but they still don't have any functionality. We add this functionality with scripts. Now ML agents already provide a script for the brain so let us add that. Click on FoodBrain gameobject and click Add component and type Brain to add Brain Script. It should look like this. Do not worry about the script fields and parameters for now.
Let us create a new folder inside the examples folder called "Sample". You can name it whatever you like. We will be saving all scripts and files required inside this folder.
Once the folder is created create three new folders. I called them "Scripts" , "Scenes" and "Brains".
Let us now begin to develop our training environment for our problem.
1. Create a new scene and save it inside the scenes folder. You can name it whatever you like. Open up the scene once saved.
2. Let us note what things will be required inside the scene. We need a food source, an agent, some obstacles, an academy and a brain to control the agent.
3. Remember always any ML agent scene should have an academy and a brain as its child object.
4. Let us create an Academy and a Brain. Create an empty game object, reset everything and name it "Academy". Create an empty child game object of "Academy" and name it "FoodBrain".
5. We now have our academy and brain objects ready but they still don't have any functionality. We add this functionality with scripts. Now ML agents already provide a script for the brain so let us add that. Click on FoodBrain gameobject and click Add component and type Brain to add Brain Script. It should look like this. Do not worry about the script fields and parameters for now.
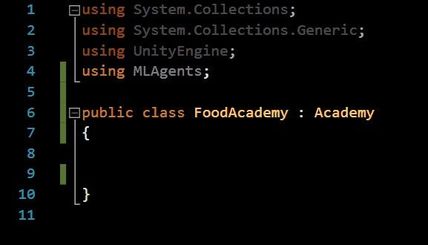
6. Now we have our brain setup so let us setup our academy. Unlike the brain script, we need to create our own script for Academy. An Academy is nothing but our training environment settings and configurations. So let us open up our folder called "Scripts" inside my folder which we previously created called "Sample". Right click and create new C# script. Let us name it "FoodAcademy". Double click and open "FoodAcademy" script.
7. There are only couple things we need to edit in this script. Firstly import the ML agents by writing using MLAgents. Secondly we need to inherit our FoodAcademy from a base class "Academy" provided by ML agents. So let us inherit from "Academy" class and not usual "MonoBehaviour". And that is it. We can keep the script empty as we have a very basic environment setup. Now we have added functionality to both our brain and academy gameobjects.
7. There are only couple things we need to edit in this script. Firstly import the ML agents by writing using MLAgents. Secondly we need to inherit our FoodAcademy from a base class "Academy" provided by ML agents. So let us inherit from "Academy" class and not usual "MonoBehaviour". And that is it. We can keep the script empty as we have a very basic environment setup. Now we have added functionality to both our brain and academy gameobjects.
8. We now have ML agents template setup. So lets start working on our problem. Let us create a ground for the agent to move on. I will be using simple Cube, so create a cube object lets name it "Ground" and I am going to scale it 80 in x and z axes to make our ground sufficiently big enough. Position the ground at 0 , 0 ,0 . Let us create a new tag called "ground" and assign it "Ground" gameobject. This step is optional as we won't be needing it.
9. We need some walls as obstacles and as a boundary to prevent agent from falling off the ground. Again I will be using simple cubes with different scales to create a bounding wall and some obstacles. I am call all my objects as "Wall". Now we need to create a tag called "wall" and assign it to all the walls and obstacles. This is an important step as we will be using this tag in our scripts later. Position all walls and obstacles above the ground. I have them all at 0 , 1, 0.
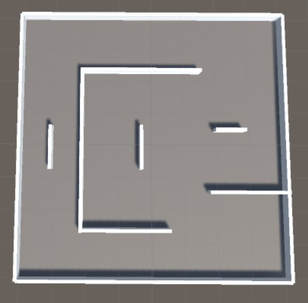
Design the environment as you wish and place some obstacles randomly. My scene now looks as shown in the below image:
9. We need some walls as obstacles and as a boundary to prevent agent from falling off the ground. Again I will be using simple cubes with different scales to create a bounding wall and some obstacles. I am call all my objects as "Wall". Now we need to create a tag called "wall" and assign it to all the walls and obstacles. This is an important step as we will be using this tag in our scripts later. Position all walls and obstacles above the ground. I have them all at 0 , 1, 0.
Design the environment as you wish and place some obstacles randomly. My scene now looks as shown in the below image:
8. Next we now need to create our food source and our agent. Again I am using simple cube and create a food source. I am creating a new material just to give a different color to our food source. I will be giving a green color for our food source (from now on referred as Target). Scale the food source as 3, 3, 3 in all axes and make sure to position it anywhere on x and z axis but 2 units on y axis. This values will be correct if you are using my scale values as well. Otherwise just make sure that the targets are above the ground.
I am calling our food source game object as "Target" and assigning it tag as "goal". Again here what tag you assign is important as we will be using this in our script. Place the target somewhere inside as the 1st position. We will be changing our target position once an agent successfully reaches it.
9. Let us create a new C# script called "Target" and assign it to our Target (food source) game object.Having a separate class makes it easier to add any specific functionality for our target if required in future.
10. Create empty gameobjects as many as you want which will act as different spawn locations for our Target (food source). I have them under a parent object called as "Target Spawns". Again keep y value of all spawn positions above ground. I have it as 2 units in y axis. Can have any value for x and z as long as they are inside the boundaries.
11. Next let us create our agent. I am using a cube with scale 2 , 1, 4 and a material with blue color. Position it wherever you like but ensure it is above ground. Note our agent will always move in its forward axis. So for my case I have it rotated -90 degrees in y-axis. You can tag the agent gameobject with "agent" tag.
Add a rigidbody component to our agent as we will be using physics for movement.
Check freeze position in y-axis as we do not want it falling below the ground. Check freeze rotation in x and z axes. Leave freeze rotation in y axis unchecked as we will be having our agent turn along y-axis.
Also add another component called "Ray perception" to our agent gameobject.
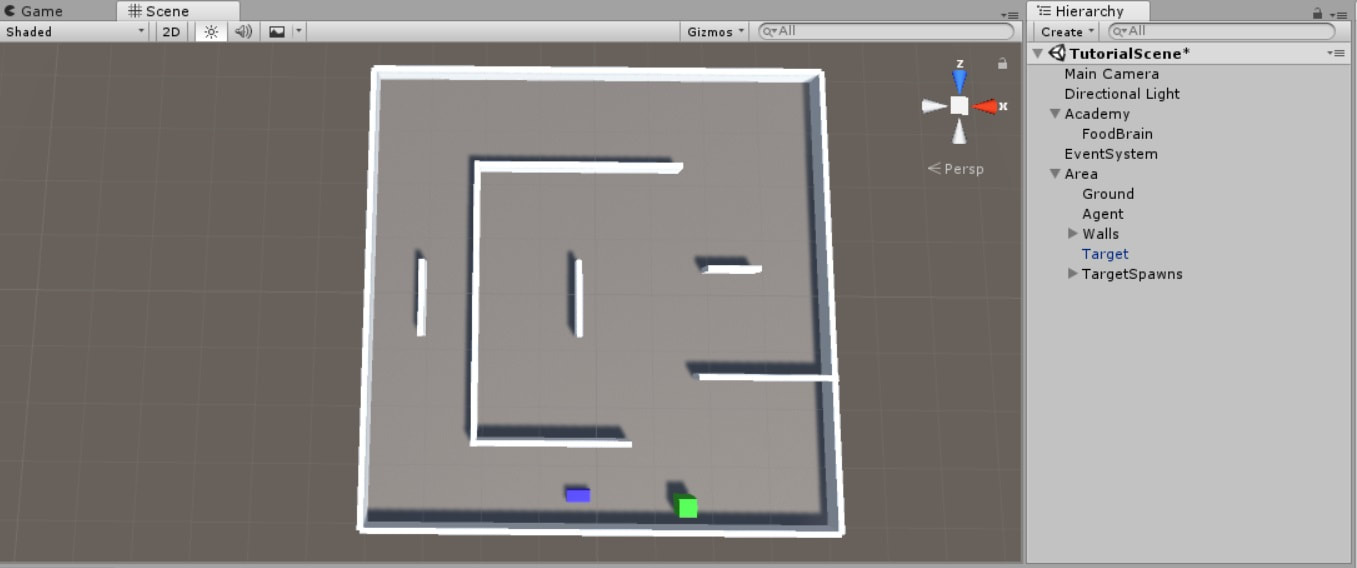
Just to make our scene look nicer and cleaner I have added all walls under one parent called "Walls", then alongwith it the agent, target and target spawns under one parent called "Area".
If you followed everything correctly, your scene should look something like this:
I am calling our food source game object as "Target" and assigning it tag as "goal". Again here what tag you assign is important as we will be using this in our script. Place the target somewhere inside as the 1st position. We will be changing our target position once an agent successfully reaches it.
9. Let us create a new C# script called "Target" and assign it to our Target (food source) game object.Having a separate class makes it easier to add any specific functionality for our target if required in future.
10. Create empty gameobjects as many as you want which will act as different spawn locations for our Target (food source). I have them under a parent object called as "Target Spawns". Again keep y value of all spawn positions above ground. I have it as 2 units in y axis. Can have any value for x and z as long as they are inside the boundaries.
11. Next let us create our agent. I am using a cube with scale 2 , 1, 4 and a material with blue color. Position it wherever you like but ensure it is above ground. Note our agent will always move in its forward axis. So for my case I have it rotated -90 degrees in y-axis. You can tag the agent gameobject with "agent" tag.
Add a rigidbody component to our agent as we will be using physics for movement.
Check freeze position in y-axis as we do not want it falling below the ground. Check freeze rotation in x and z axes. Leave freeze rotation in y axis unchecked as we will be having our agent turn along y-axis.
Also add another component called "Ray perception" to our agent gameobject.
Just to make our scene look nicer and cleaner I have added all walls under one parent called "Walls", then alongwith it the agent, target and target spawns under one parent called "Area".
If you followed everything correctly, your scene should look something like this:
12. Let us now create an Agent script. Create a new script called "FoodAgent" and open it up. Let us define some variables as follows:
Make sure you add using MLAgents and inherit from base class Agent
The agent will continuously move at some constant speed thus requiring Rigidbody reference and speed variable. Target will be our target (food source) to drag and drop from scene.
The targetspawns array will be used to randomly spawn the target at one of these spawn points.
The two Vector3 startPos and startRot will be used when we reset our agent as it was at the starting point.
We will be using SphereCasts to detect obstacles, walls or food source.
We will have just about 100 lines of code for the agent. We will be using reinforcement learning so, that code will be written here in agent script. It isn't much complicated trust me.

Any Agent script will have three must use common functions derived from base class. They are Collect Observations, Agent Action and Agent Reset. Let us go through each one by one.
1. Collect Observations: Remember we are using Reinforcement Learning. The agent needs some way to see or rather gather data about the environment it is in. You may have created a level and placed the agent inside it, but currently it cannot know or understand anything about the environment.
Thus this function provides us a way to tell the agent about the environment. This function is used by the agent to explore and perceive the environment it is in continuously. This observation values are then used by the brain to decide a proper action to be taken by the agent.
Consider these observation values as an input to the neural network which the brain comprises of to give some output value as an action to be taken by the agent.
Consider the same simple car example described previously. The task is simple as the car has to reach the target which is at a distance of 50 units right in front of it. The car can turn right, left or move straight. Thus for this example our collect observation method can be as simple as just having the distance value between car and the target. That is it. The car agent will continuously collect observation as the distance value as it moves around and tweaking its actions in the course of time.
Now moving back to our example.
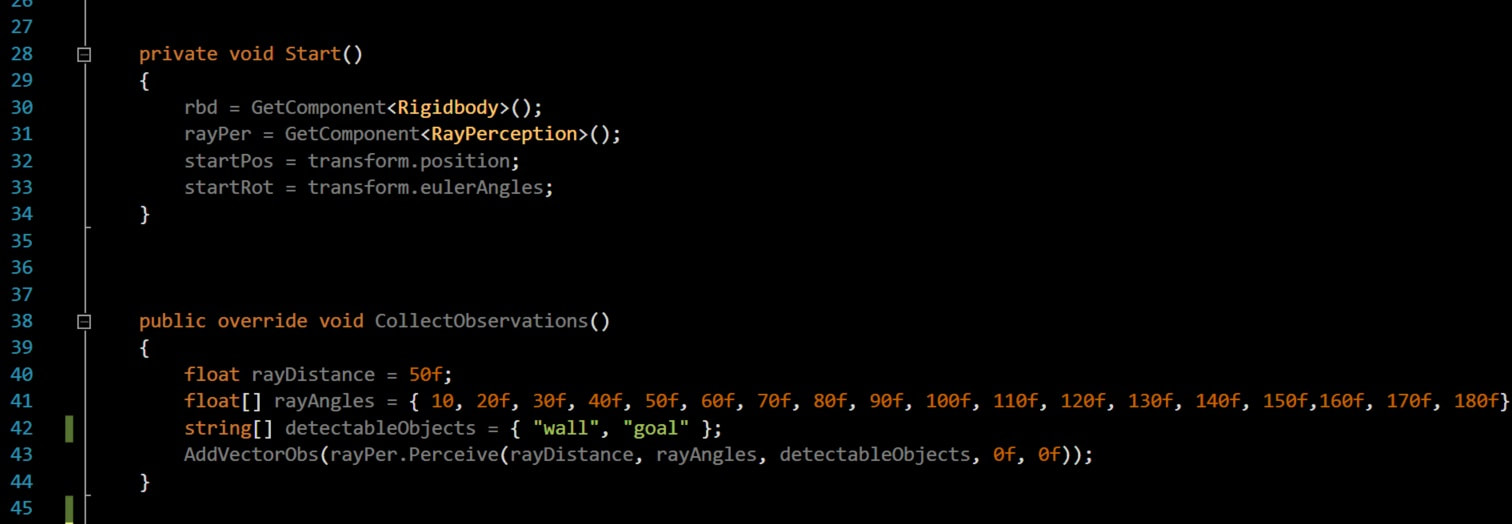
We want our agent to locate the food source and avoid any obstacles (walls). Thus the best way would be to use raycasts and scan the environment. We can then store the distance of all the objects hit by the raycasts and use those distance values as our observations.
Thankfully, ML Agents have already made this readily available for us with "Ray Perception" component.
We just feed the distance of ray, angle at which to cast ray and which objects to detect by their tags. That is why tags were important.
As you can see from the below image I am using a ray of distance 50 and casting rays at every 10 degrees till 180 degrees as I only want the agent to have vision of what is in front of it.
Detectable objects will have the tag names of all the objects that you want to detect. We just want to detect wall and goal as defined by our tags previously.
Now important thing to note here is RayPerception uses SphereCasts and not Raycasts. The difference between SphereCasts and RayCasts is that Sphere cast stops when the sphere hits any object and will not detect further objects even if our specified ray distance is greater. Here is the link to it.
https://docs.unity3d.com/ScriptReference/Physics.SphereCast.html
RayPerception.Perceive function will return a list of floats which will be the distances of all the objects hit by ray from the agent.
Finally you collect all the observations using AddVectorObs function. You can add bools, floats, ints, lists as part of you observations.
You can collect observations as either Continuous type or Discrete type. Continuous type will collect floating points as observations whereas a discrete type will collect indexes to an internal table of agent state as integer values.
But mostly for all environments we will be using Continuous Vector space for collecting observations.
Here is a link for more description on types :
https://github.com/Unity-Technologies/ml-agents/blob/master/docs/Getting-Started-with-Balance-Ball.md
Do not worry if you do not understand what to write inside this function straight away as I myself struggled when I was starting with machine learning. It takes time to finally understand and have some idea what can be added here.
1. Collect Observations: Remember we are using Reinforcement Learning. The agent needs some way to see or rather gather data about the environment it is in. You may have created a level and placed the agent inside it, but currently it cannot know or understand anything about the environment.
Thus this function provides us a way to tell the agent about the environment. This function is used by the agent to explore and perceive the environment it is in continuously. This observation values are then used by the brain to decide a proper action to be taken by the agent.
Consider these observation values as an input to the neural network which the brain comprises of to give some output value as an action to be taken by the agent.
Consider the same simple car example described previously. The task is simple as the car has to reach the target which is at a distance of 50 units right in front of it. The car can turn right, left or move straight. Thus for this example our collect observation method can be as simple as just having the distance value between car and the target. That is it. The car agent will continuously collect observation as the distance value as it moves around and tweaking its actions in the course of time.
Now moving back to our example.
We want our agent to locate the food source and avoid any obstacles (walls). Thus the best way would be to use raycasts and scan the environment. We can then store the distance of all the objects hit by the raycasts and use those distance values as our observations.
Thankfully, ML Agents have already made this readily available for us with "Ray Perception" component.
We just feed the distance of ray, angle at which to cast ray and which objects to detect by their tags. That is why tags were important.
As you can see from the below image I am using a ray of distance 50 and casting rays at every 10 degrees till 180 degrees as I only want the agent to have vision of what is in front of it.
Detectable objects will have the tag names of all the objects that you want to detect. We just want to detect wall and goal as defined by our tags previously.
Now important thing to note here is RayPerception uses SphereCasts and not Raycasts. The difference between SphereCasts and RayCasts is that Sphere cast stops when the sphere hits any object and will not detect further objects even if our specified ray distance is greater. Here is the link to it.
https://docs.unity3d.com/ScriptReference/Physics.SphereCast.html
RayPerception.Perceive function will return a list of floats which will be the distances of all the objects hit by ray from the agent.
Finally you collect all the observations using AddVectorObs function. You can add bools, floats, ints, lists as part of you observations.
You can collect observations as either Continuous type or Discrete type. Continuous type will collect floating points as observations whereas a discrete type will collect indexes to an internal table of agent state as integer values.
But mostly for all environments we will be using Continuous Vector space for collecting observations.
Here is a link for more description on types :
https://github.com/Unity-Technologies/ml-agents/blob/master/docs/Getting-Started-with-Balance-Ball.md
Do not worry if you do not understand what to write inside this function straight away as I myself struggled when I was starting with machine learning. It takes time to finally understand and have some idea what can be added here.
2. Agent Action :
Agent Action is where we decide what actions the agent should take. Now the values for these actions will be generated by the "Brain" component which we will link later. However, what action these values specify is decided by our logic.
Similar to our collect observation method, Agent actions can be taken continuously or discretely.
What that means here is that a continuous type will have continuously varying values which can be integers or floating points. A good example is varying speed, or rotation.
A discrete type will have an index value and we need to specify what that index value means. If the value index is "1", we need to define what action "1" specifies. That is why we use it along with a switch case to define each index returned by discrete type.
Let me make it more clear with our example.
Remember our agent will move continuously at a constant speed in its forward direction. So let us write that by assigning velocity to our rigidbody attached to the agent.
rbd.velocity = transform.forward * speed;
Now what actions should the agent learn, to successfully navigate through our level when it is moving at a constant speed? The answer is that the agent should learn to rotate by some amount so that if it rotates by 90 degrees right it will turn right while moving at constant speed. That will be our agent movement logic.
So the only value we need to get from the "Brain" is the rotate amount. We want our agent to rotate along Y-axis which is also its Up-axis.
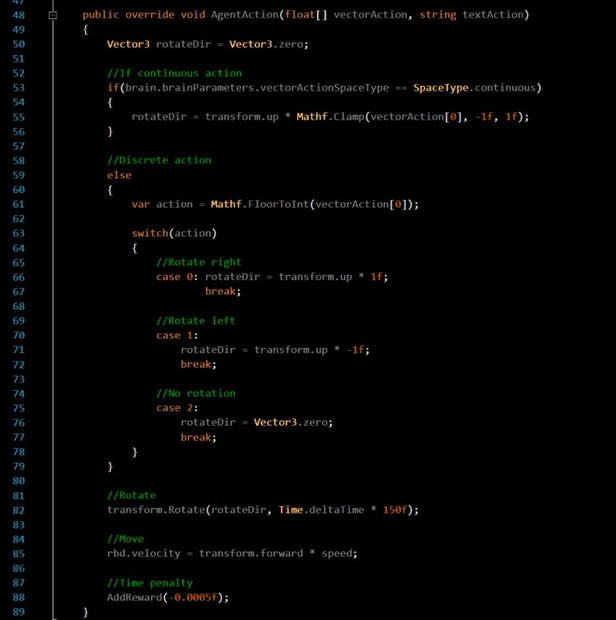
You can see that AgentAction function takes two arguements one of which is an a float array called "vectorAction". Ignore the other arguement "textAction" as we won't be needing it.
To get the values from the brain, we use the arguement float[] vectorAction which will have all the values outputted / forwarded by the "Brain" based on our input given to "Brain" from "collect observations" method. So let us assign that.
First create a Vector3 rotateDir and initialize it to zero.
Next, assign the vector action values to the rotateDir.
rotateDir = transform.up * Mathf.Clamp(vectorAction[0] , -1f, 1f);
Here we multiply by transform.up as we want to rotate agent around its Y-axis. We are also clamping the values to range of -1 to 1 as we will be scaling these values later. Remember we are using continuous vector space so will have continuously varying values for our rotateDir.
We get our value from vectorAction[0] i.e the first value output from brain.
Now for our example we only need to have 1 value to learn automatically which is rotateDir. In case if we wanted to learn and automate speed as well we could add another statement such as
speed = Mathf.Clamp(vectorAction[1] , -1f, 1f ) * scaleAmount i.e Here vectorAction[1] means the second value output from brain.
Note that the brain does not know what its output values mean. The logic is defined by us what they mean. The brain will just continuously tweak the values according to our observations and rewards.
Similarly, if we have a discrete action space, we will only get integer index values as actions. We need to define what these indexes mean. We will not be having continuously values so each index our agent will rotate by some fixed amout. Let the fix amount be 1 to rotate right, -1 to rotate left and 0 for no rotation.
Unlike continuous space we will never get values 1, -1 and 0 from discrete, what we actually get are array indexes such as 0 ,1,2 ,3 .. depending on number of actions we need.
For continuous space we only needed 1 action, but for discrete we need 3 separate indexes to turn left, right or no turn at all.
That can be defined as shown below in a switch case.
Now finally, we have our rotation values from brain for both types, now we need to scale these values to actually rotate the agent. What we have got are only directional values, so let's scale by some rotate amout. I have my rotate amount as 150.
transform.Rotate(rotateDir, Time.deltaTime * 150f);
That is it. We have defined our logic for Agent Actions.
Agent Action is where we decide what actions the agent should take. Now the values for these actions will be generated by the "Brain" component which we will link later. However, what action these values specify is decided by our logic.
Similar to our collect observation method, Agent actions can be taken continuously or discretely.
What that means here is that a continuous type will have continuously varying values which can be integers or floating points. A good example is varying speed, or rotation.
A discrete type will have an index value and we need to specify what that index value means. If the value index is "1", we need to define what action "1" specifies. That is why we use it along with a switch case to define each index returned by discrete type.
Let me make it more clear with our example.
Remember our agent will move continuously at a constant speed in its forward direction. So let us write that by assigning velocity to our rigidbody attached to the agent.
rbd.velocity = transform.forward * speed;
Now what actions should the agent learn, to successfully navigate through our level when it is moving at a constant speed? The answer is that the agent should learn to rotate by some amount so that if it rotates by 90 degrees right it will turn right while moving at constant speed. That will be our agent movement logic.
So the only value we need to get from the "Brain" is the rotate amount. We want our agent to rotate along Y-axis which is also its Up-axis.
You can see that AgentAction function takes two arguements one of which is an a float array called "vectorAction". Ignore the other arguement "textAction" as we won't be needing it.
To get the values from the brain, we use the arguement float[] vectorAction which will have all the values outputted / forwarded by the "Brain" based on our input given to "Brain" from "collect observations" method. So let us assign that.
First create a Vector3 rotateDir and initialize it to zero.
Next, assign the vector action values to the rotateDir.
rotateDir = transform.up * Mathf.Clamp(vectorAction[0] , -1f, 1f);
Here we multiply by transform.up as we want to rotate agent around its Y-axis. We are also clamping the values to range of -1 to 1 as we will be scaling these values later. Remember we are using continuous vector space so will have continuously varying values for our rotateDir.
We get our value from vectorAction[0] i.e the first value output from brain.
Now for our example we only need to have 1 value to learn automatically which is rotateDir. In case if we wanted to learn and automate speed as well we could add another statement such as
speed = Mathf.Clamp(vectorAction[1] , -1f, 1f ) * scaleAmount i.e Here vectorAction[1] means the second value output from brain.
Note that the brain does not know what its output values mean. The logic is defined by us what they mean. The brain will just continuously tweak the values according to our observations and rewards.
Similarly, if we have a discrete action space, we will only get integer index values as actions. We need to define what these indexes mean. We will not be having continuously values so each index our agent will rotate by some fixed amout. Let the fix amount be 1 to rotate right, -1 to rotate left and 0 for no rotation.
Unlike continuous space we will never get values 1, -1 and 0 from discrete, what we actually get are array indexes such as 0 ,1,2 ,3 .. depending on number of actions we need.
For continuous space we only needed 1 action, but for discrete we need 3 separate indexes to turn left, right or no turn at all.
That can be defined as shown below in a switch case.
Now finally, we have our rotation values from brain for both types, now we need to scale these values to actually rotate the agent. What we have got are only directional values, so let's scale by some rotate amout. I have my rotate amount as 150.
transform.Rotate(rotateDir, Time.deltaTime * 150f);
That is it. We have defined our logic for Agent Actions.
Reward System
Now that we have defined our agent logic, we still need to define a reward system which tells the agent whether the actions taken are good or bad.
First thing straight away what we want is to limit the exploration time for our agent. We do not want the agent to take 10 hours to reach the target. So we punish the agent for every time step to motivate it to finish the task quickly.
This is done in the Agent Action function as shown int the above image at the very bottom with AddReward(-0.0005f). We are subtracting 0.0005 from the current mean reward value of agent per time step.
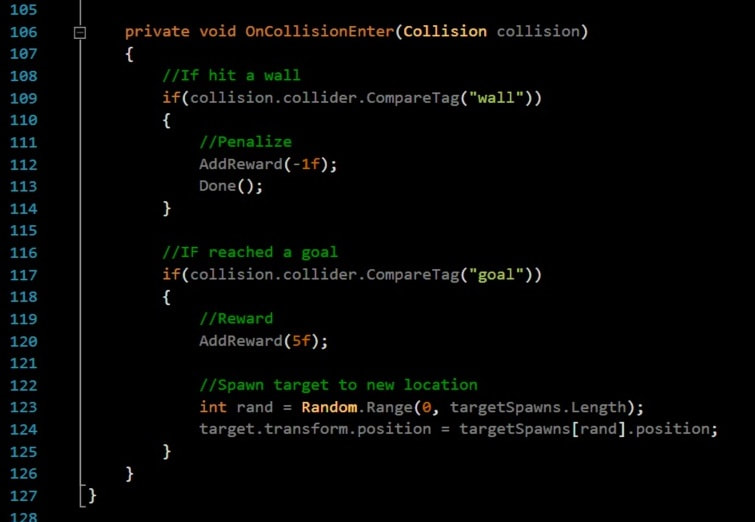
Let us think what actions can we reward our agent for and what actions can we penalize the agent for. Obviously we don't want our agent to hit any bounding walls or obstacle walls. So if an agent collides with either we will punish the agent.
We can punish the agent by giving it a negative reward value. It can be done as shown below with AddReward(-1).
So every time our agent hits either a wall or on obstacle we will punish it by subtracting -1 from its current cumulative average reward.
Now similarly if our agent is successfully able to locate and reach our target (food source) we should reward it heavily as it completed the given task.
This is done similarly by AddReward(5). We are rewarding our agent with 5 value every time it successfully reaches the food source.
You can see that I have an additional function named Done() after a collision check with wall is made.
The function Done() specifies that the agent should reset and start again , sort of like game over. As our agent hits any wall, we penalize and restart again.
Now that we have defined our agent logic, we still need to define a reward system which tells the agent whether the actions taken are good or bad.
First thing straight away what we want is to limit the exploration time for our agent. We do not want the agent to take 10 hours to reach the target. So we punish the agent for every time step to motivate it to finish the task quickly.
This is done in the Agent Action function as shown int the above image at the very bottom with AddReward(-0.0005f). We are subtracting 0.0005 from the current mean reward value of agent per time step.
Let us think what actions can we reward our agent for and what actions can we penalize the agent for. Obviously we don't want our agent to hit any bounding walls or obstacle walls. So if an agent collides with either we will punish the agent.
We can punish the agent by giving it a negative reward value. It can be done as shown below with AddReward(-1).
So every time our agent hits either a wall or on obstacle we will punish it by subtracting -1 from its current cumulative average reward.
Now similarly if our agent is successfully able to locate and reach our target (food source) we should reward it heavily as it completed the given task.
This is done similarly by AddReward(5). We are rewarding our agent with 5 value every time it successfully reaches the food source.
You can see that I have an additional function named Done() after a collision check with wall is made.
The function Done() specifies that the agent should reset and start again , sort of like game over. As our agent hits any wall, we penalize and restart again.
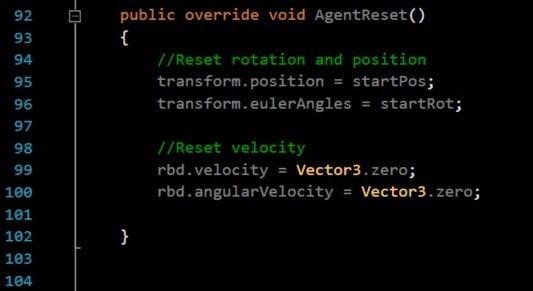
3. Agent Reset :
This Done() functions to reset an agent calls the function AgentReset()
This function is similar to what we use while coding normal game reset functionality.
On reset we need our agent to return back to its starting position with its original rotation and having zero velocity.
That is all we need to do in ML Agents in terms of scripting.
Now we have coded our Agent script, We have our Academy and Brain scripts attached to the respective game objects as well. Now finally we need to link our agent and brain and tweak parameters in all these scripts. Lets start first with the agent script.
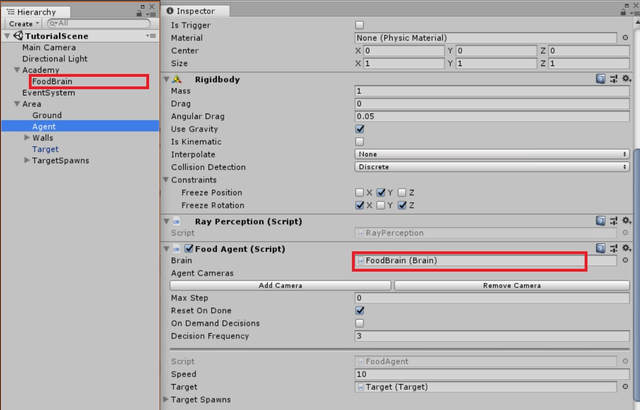
1. FoodAgent Script
Recall that all our action values from the float [ ] vector actions were determined by the "Brain" component. Thus, we need to link the Brain to the agent script. Drag and drop the "FoodBrain" gameobject into the brain field of Agent Script.
1. FoodAgent Script
Recall that all our action values from the float [ ] vector actions were determined by the "Brain" component. Thus, we need to link the Brain to the agent script. Drag and drop the "FoodBrain" gameobject into the brain field of Agent Script.
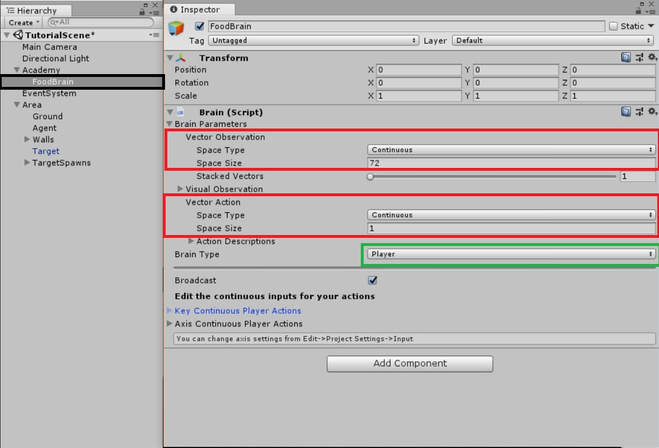
2. FoodBrain Script
Now lets adjust Brain parameters to appropriate values.
1. Set Vector observation space type to continuous as we want to continuously collect observations.
2. Set the Space size to 72. This value is number of observations we collect. As we are using Rayperception with 18 different angles, we will be storing 2 values, the index and the distance for each sphere cast per angle per object tag.
We have 18 angles, storing 2 values for 2 objects (wall and goal) = 18 x 2 x 2 = 72
3. Set Vector action space to continuous as we want continuous values for our rotation. You can set discrete if you want, our agent script handles that too.
4. Set space size to 1 as we only need 1 continuous value i.e our rotateDir variable. If you have set vector action space type as discrete you will need to set size as 3. As discussed already we need 3 discrete indexes to turn left, right or move straight.
5. For now set the Brain Type to player. We will discuss more on this in next part, where we will learn how to start the training.